April 29, 2011

Raspberry Bushes!

OK, so it's not really 'crafty' persay - but who doesn't love raspberry bushes??  We always had tons of raspberries growing up, between my dad and my grandfather.  Grandma Sweetie always made THE BEST raspberry pie.  So now that I live in a northern climate you bet my first order of business was to have my dad hook me up with some raspberry bushes!  Woooohooooo! 


The next time I make a raspberry pie I'll post the recipe - I promise, you would not be disappointed!  Nothing like a raspberry pie from the store.

Happy Friday!

April 28, 2011

Progress

Well, so far I have one 12.5 inch by 12.5 inch quilt block finished from my scraps for Aneela's Crazy Scrappy Quilt a Long.


At this point I'm not sure how I feel about my color choices, but it is meant to be a scrap block, so I'll stick it out. I'm thinking three of these blocks together along with some plain fabric between might make a really nice table runner. Choices, choices.

April 26, 2011

A purse for Grandma...

I have been dying to try to make a purse out of clear vinyl, so when I heard my Grandmother was looking for a little see-thru change purse I had a go.  I hope she likes it!  I have big plans to make a similar one for my daughter and I'll take pictures of the process on that one.


This was zipper number two (out of ten) from my Zipit purchase.  Not too shabby, eh?  The first one went into my Gathered Clutch.

On a side note, I know my pictures pretty much stink.  I promise I'm working on figuring out how to take better photos!  I do have the hubs' nice Digital SLR - at this point it's pretty much user error!  Haha.

April 25, 2011

Princess and the Pea

How totally adorable is this idea for The Princess and the Pea:
http://tonicoward.blogspot.com/2010/08/princess-and-pea.html

Another one is here:
http://sweetcheeksdesigns.blogspot.com/2010/12/princess-and-pea.html

You know I had to come up with my own version!  I will tell you, the book really is fabulous and fun to read.

Little Lady A aquired an 18" doll at Christmas, so rather than make a whole new doll (and you know I had to restrain myself there!), I made her 18" doll a Princess and the Pea dress. 

This was part of her Easter gift (hence all the eggs you see in the background of this picture).


I made the 12 mattresses out of leftover fabrics, and I tried to use the wildest fabrics I had.  I used a piece of batting in each mattress to make them a little thicker.

The dress is mostly put together using this Disney Princess Simplicity dress pattern.  The skirt is altered a bit, but not much.


I hear that once girls hit the pre-teen years they become uber-fascinated (obsessed?) with the American Girl dolls.  I'm hoping that by having a few things made already that will fit those dolls I'll (hopefully) be a bit ahead of the game!

Have a great week everybody!

April 22, 2011

crazy scrappy quilt a long

I love the fabrics Aneela designs for Moda.  I have no idea why...they just really appeal to me.  If I wasn't committed to foregoing new fabric until I use up some of my old stash, then her new line (Sherbet Pips) would already be on its way to my house.  I was even tempted to preorder it but was strong enough to just say no.  It wasn't easy.  I seriously have a fabric addiction problem.

As luck would have it, Aneela is doing a sew-a-long in which I get to use my scraps - yay!  I have a whole box full just waiting for this.  I cannot wait to get started!  Although, I'm thinking these blocks are more likely to find their way into placemats, table runners, hotpads, and mugrugs (things I sorely need!)  before they end up in a quilt.

Button

I'm thinking I'll do yellows/oranges/shades of brown and white....that sounds like happy table runners and placemats, right?


Lets get sewing!

Kate

April 21, 2011

Gift for a Preemie

Every now and then I get to work on a project that just seems really meaningful.  Really heartfelt.  I love making gifts for people in general...I think it's a fantastic way to show friends and family that I care about them.  Taking time to think up something uniquely for that person and using the time and energy to make it...that's precious.

Recently I was able to make a gift for a friends' sister who gave birth to a perfect little girl, but several months early.  I hope this blanket and hat set warmed her heart!


I used a Make It and Love It tutorial for this project.  She had some really good advice about sewing the rib knit around the outside of the blanket, but honestly I felt like the rib knit was a little bulky for just a single layer knit blanket.  BUT it sure did turn out cute, right?  Not as cute as little miss Elliot though, I assure you!

April 20, 2011

Bunny Shirts

Last week I was looking for a quick little project (instant gratification!  ain't it grand?) and settled on making the little ones matching bunny shirts - something I'll probably only be able to get away with for another few years.


I grabbed two collared shirts from Target (I seriously love this blue!), drew up a quick bunny and sewed it down using some left over Steam-a-Seam and fleece.  It's not great, but it works!  Next year I need to spend a bit more time on the design and execution, but for now I'm satisfied.  The Easter Bunny didn't mind that they weren't perfect! 

April 19, 2011

Gathered Clutch

Have I mentioned yet how much I love Anna over at Noodlehead?  She has a fantastic blog and I love just about every one of her projects.  One of my favorites is her Gathered Clutch.  I made one for a friend a while back, and really didn't want to give it up....


So when I wanted to make a little something for myself to match my new Cosmo Bag, I pulled out the ol' tutorial and had at it.  And I LOVE it.


Here's the back:


I added a small ribbon onto the zipper so it'd be easier to open if my hands are full....like in the middle of a fabric store when I've got two kiddos hanging on me...and a keyring so I could attach it to a ring I sewed into my Cosmo Bag.  Loving this set!

April 18, 2011

Amy Butler's Style Stitches

A while back I stumbled upon this Amy Butler's Style Stitches sew-a-long.
http://www.flickr.com/groups/1615921@N22/

I'm not the biggest Amy Butler fan, but I really think it's just because her fabrics are a bit much for me.  After seeing some of the gorgeous photos of her Cosmo Bag (the first bag in the book) done in some non-Amy fabrics, I fell in love and went out to buy the book right away (Amazon link here).


The book really is fabulous.  Out of 12 bags (including several options), there are only one or two bags in the book I don't like.  I have a girls' trip coming up and just knew that the Cosmo Bag would do me right out and about with the ladies.

And so, I set to work.  There are a LOT of pieces to this bag, people.  A - LOT.


It took a while to put together, but I absolutely love the bag.  I wish I had added a large zipper pocket to the inside, but I simply didn't have the energy at the time and just wanted to finish putting this thing together.  I did add a little keyring to the inside of the bag so I could tether a small change purse....otherwise there's really no safe place to secure a wallet (or anything else you don't want lost in the depths!).  It turned out cute, no?


I will say that I should have followed Amy's directions on sewing the front pleats.  She tells you to fold and sew them one at a time....of course I tried to cheat and fold them all, pin them, then sew at the same time.  I never could get it to lie correctly! 

I also wished I'd chosen a different type of heavy-weight red fabric for the accents.  I chose duck cloth, and since I wanted to use black thread throughout the project, I learned that you can REALLY tell when the stitching isn't perfect.  And it's impossible to get perfect on duck cloth because the dang stuff is so thick and stiff.  Ah well, lesson learned.


I thought about working on this little number next...Project number 7:  The Key Keeper Coin Purse.


Except I realized I needed a bigger 'wallet' for my travels and settled on the Gathered Clutch from Noddlehead.  More on that another day!

Kate

April 15, 2011

Kids Lacing Cards Tutorial (learn to sew)

An easily printable version of this tutorial can be found at:


Do you remember having those little cardboard figures with the holes punched out that you could practice ‘sewing’ with shoelaces?  I looked everywhere for them for my daughter’s class and had no luck, so figured I’d better make my own.  The beauty of this project is that it’s easily personalized.  Use a name, a photo, a bit of original artwork…whatever you have on hand!

Materials:  Mod Podge and paint brush, hole punch, paper for the background, thin cardboard (such as a Yoplait box or the cardboard backing of a notepad), shoelace or thick string, scissors or rotary cutter.
Optional:  photo or letters or artwork (to make the project personal!), bead, brayer

 Let’s Do It!
1.      Using the paint brush, apply a thin layer of Mod Podge to the cardboard.  Place the background paper on the cardboard and flatten.  Do your best to work out all the air bubbles.  Use a brayer if you have one (not required).  Allow to dry. 

2.      Repeat with the opposite side of the cardboard.  Allow to dry.

3.      Using the paint brush, apply a thin layer of Mod Podge on top of the background paper.  Lay the photo/letters/artwork as desired and smooth with your fingers, working out all air bubbles.  Allow to dry.


4.      Using the paint brush, apply a final layer of Mod Podge over the entire top.  Allow to dry.

5.      Cut out your design as desired.  Mine were all straight names so I used my rotary cutter (yup, definitely needed a new blade after this project).


6.      Punch holes as desired throughout the project.


7.      Knot the end of the shoelace several times to keep the lace from pulling through the project. If you want to add a bead (not required), add the bead and then knot again in front of the bead so the bead will not come off.  I thought having the bead made it a bit more fun and would also help the string not pull through the project.


8.      Have at it!

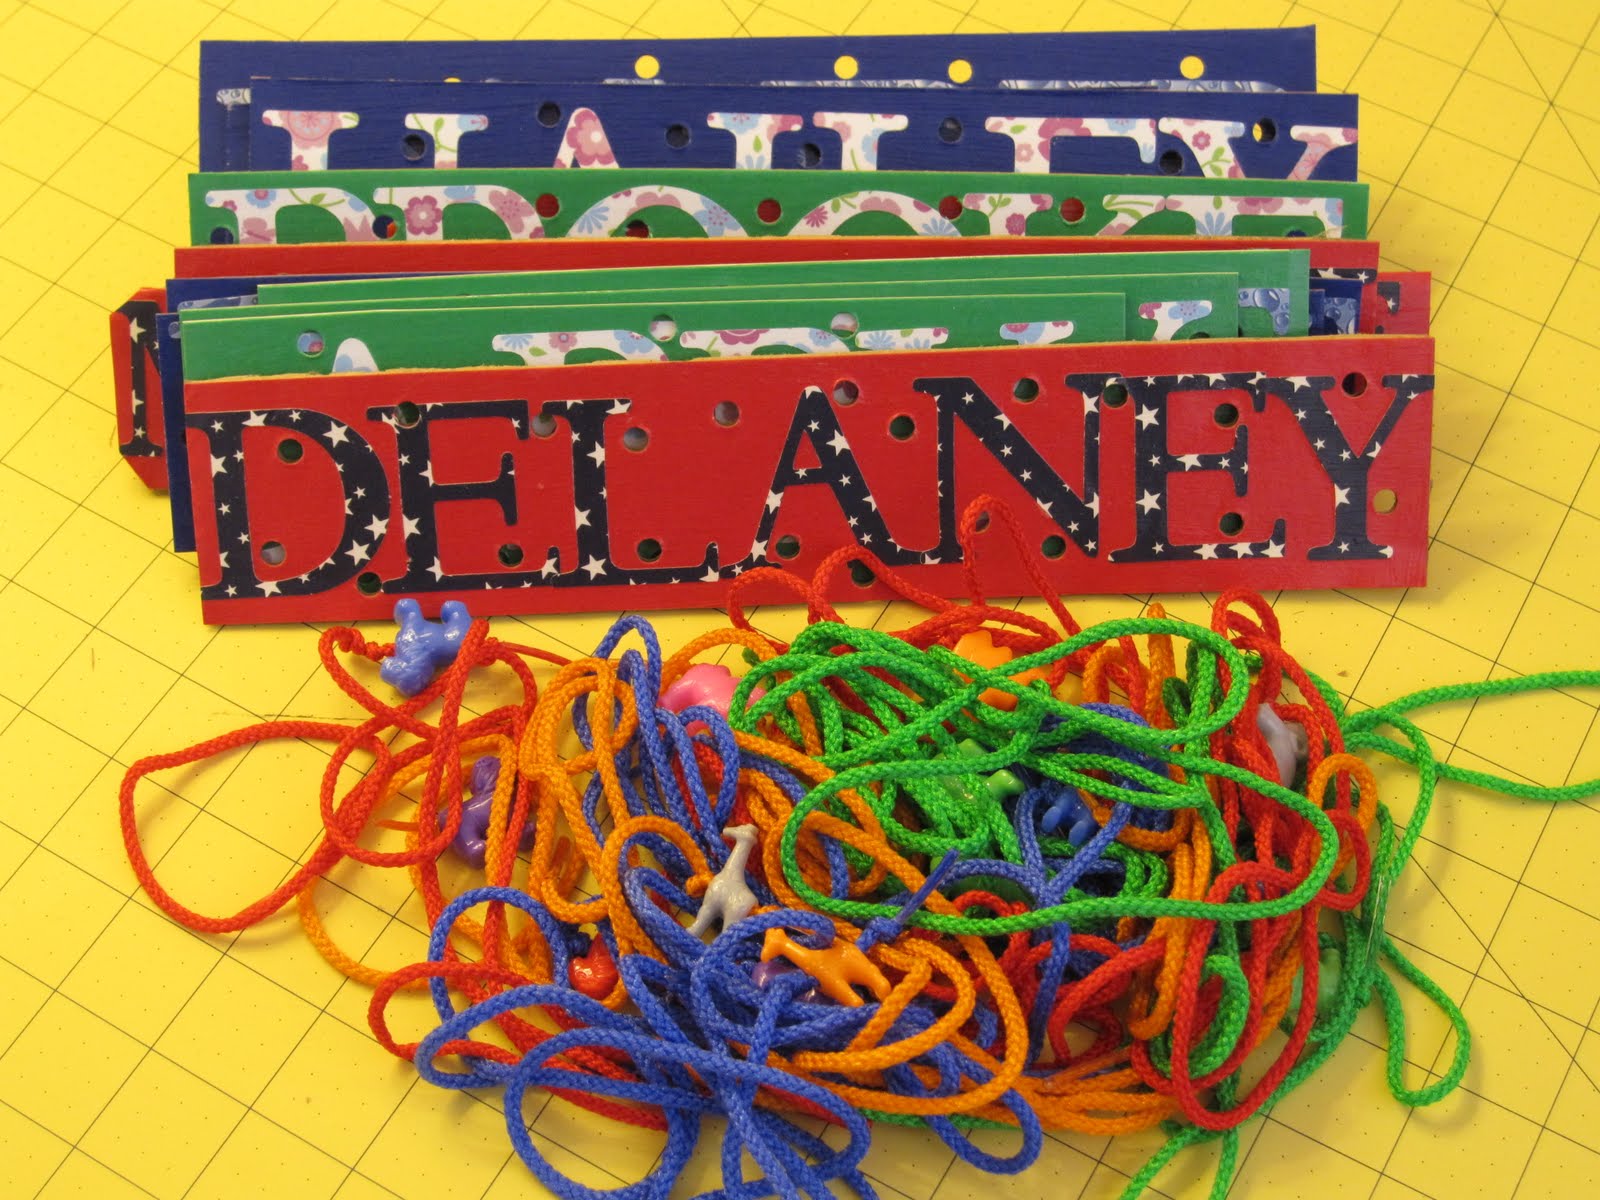
9.      And if you’re like me…if one is good, fifteen is better.  Mama went a little overboard on this one, eh?


If you make any lacing cards, I would LOVE to see them!  Please take a moment to upload photos on my Flickr site:

Feel free to make as many of these as you’d like for personal use only, and give credit where credit is due.

April 14, 2011

Hanging Book Sling


Mission:  Use your fabric.
Project:  Hanging Book Sling.
    http://pennycarnival.typepad.com/penny_carnival/2009/02/tutorial-hanging-book-display.html

After our move, I became slightly embarrassed by the sheer amount of fabric I have accumulated.  I wouldn't call it a 'problem' exactly....but really, enough is enough.  In our new house I just don't have the space to hide store it like I used to.  My goal these days is to use up what I have.  I thought a great way to work on that is by making a book sling.

I pulled out an old bed sheet in good condition - that even matched the kids play space!  And set to work.  The tutorial was very easy to follow.  For the hanger, I purchased a double curtain rod from Walmart.  Doesn't get much easier to hang than that (much to my husband's delight)!

Since the fabric was plain, I pulled out the Cricut and cut a 'BOOKS' freezer paper stencil (we can talk about doing that another day - so easy....no sewing required!).  But....look at what a mess I made with the fabric paint!  Aaargh.


Thankfully I have a very talented friend who suggested I add a bookworm to the sling to cover the paint spill...if I'd have known I was adding the worm I would have left it at 'BOOK' instead of 'BOOKS'.  Oh well!

Great use of a big piece of fabric, and a wonderful way to clear out a bookshelf to make room for...more toys?

April 13, 2011

On the craft table...

Doesn't this just look like a whole table full of FUN???


More on that (non-sewing, for sewing) project another day.

I also just received this gorgeous package in the mail....I get all jittery with excitement!  It's part of my master plan to get over my fear of sewing zippers.  I feel like I can never keep my seams quite straight when I sew them on.  Any tips?


I have plans for a few of these zippers, but I really can't wait to find out what all these pretty ladies will end up in or on.  I ordered them from zipit on etsy,and lemmie tell you, for $0.50 per zipper I'd definitely do it again.  Super cheap and packaged so beautifully.  Hopefully they'll hold up well!

Have a fabulous Wednesday!

April 12, 2011

Preschooler Library Tote Tutorial

An easily printable copy of this tutorial is found at:
http://www.scribd.com/doc/52856324/Preschool-Tote-Public

I love tote bags for little ones.  No pesky zipper to slow you down!  Of course, that does mean your cherished dolls or cars may fall out at any moment, but it’s a risk we take around our house.  The problem is that most tote bags are too big for preschoolers.  Even the bag my daughter’s preschool gave her is too big.  I measured her school bag, downsized it, and found a better size for her.

This idea isn’t new.  I’m sure you can find several similar bags out there.  I love this one by Noodlehead:
http://www.noodle-head.com/2010/08/library-tote-tutorial.html
And I really liked the idea of having a place for your library card like this bag:
http://whipup.net/2010/10/06/2010-whipup-guest-blogging-series-library-tote-tutorial/

If you’d like to make one like ours, here you have it:

Materials
Lining Fabric:  Cut 2 rectangles 12.5” x 13.5”(bag lining), cut 2 rectangles 3.25” x 4.75” (card holder), cut 2 rectangles 12.5” x 7” (outer pocket), cut 2 rectangles 4” x 20” (straps)
Outer Fabric:  Cut 2 rectangles 12.5” x 13.5”(outside of bag), cut 1 rectangle 4.5” x 4”( Velcro closure)
Clear Vinyl: Cut 1 rectangle 3.5” x 2.25”
Velcro:  (whatever width you have on hand – I used ¾”) Cut one piece 1” long
Interfacing:  If you choose a lightweight fabric (such as cotton) for your lining or main fabric, I suggest using interfacing on the main parts of the bag: outer bag, bag lining, outer pocket.  You’ll be much happier with the result if you do!
Seams: I used 1/4" seams throughout.

Let’s Sew!!
1.      Apply interfacing if needed to the pocket, outer or lining fabrics of the bag.

2.      Bag Lining:
  • Place the two 12.5” x 13.5” lining pieces right sides together.  Sew both sides of the bag (13.5” sides) and bottom of the bag (one of the 12.5” sides).  Leave a 5” opening along the bottom to turn the bag once it is assembled. 
  • Realign one of the bottom corners of the bag – fold out the corner so that the seams lie on top of each other.  Cut off approximately 1” of the bottom corner. 

  • Sew the resulting opening closed.  Repeat with the other corner. 


Boxing the corners like that will help give your bag some structure.  Set bag lining aside.


3.   Straps: (perform this step for both straps)
  • Fold the 4” x 20” fabric lengthwise and iron to form a crease down the middle. Open the fabric.
  • Fold over each edge to meet the middle crease and iron. 


  • Fold again at the middle crease and iron. Topstitch 1/8” from each side. Set straps aside.

4.      Pocket:
  • Place the two 12.5” x 7” pieces right sides together and sew along one of the 12.5” sides only.  Open fabric and fold back at the seam.

  • Iron or finger press, and topstitch 1/8” from the edge along the seam only.  This will be the top of your pocket.


  • Lay one of the outer bag pieces right side up.  Align pocket with the bottom edge of the outer bag piece and baste in place along the three raw edges.  Set aside.


5.      Card Holder:
  • Place the vinyl in the BACK center of one of your 3.25” x 4.75” pieces and stitch in place.


  • Carefully cut the fabric from the front of the vinyl.
  • Use a small zigzag stitch to keep fabric from fraying around the edge of the vinyl.
  • Fold over ¼” of one of the short (3.25”) sides and iron. Be careful not to iron the vinyl!  Straight stitch or zigzag stitch in place.


  • Lay vinyl piece on top of the other 3.25” x 4.75” rectangle (both right sides facing UP), aligning the three unfinished sides.  Fold the three unfinished edges under by ¼” and carefully iron.


  • Pin the card holder to one of the outer bag pieces (mine is on the same side as the pocket) and sew around outer edge.  Be careful not to sew the card holder closed!


  • Use a tight zigzag stitch along the raw edge at the side to prevent fraying.


6.      Velcro Closure:
  • Sew one side of the Velcro to the top middle of the outer bag piece you have been working on.  I placed mine approximately 5.75” from the left edge, and ¾” down from the top edge.  Set bag piece aside.


  • Create the tab for the opposite side of the bag:
    • Iron, fold, and topstitch the 4.5” x 4” piece of fabric in the same way as the straps in step 3.  If you are using a fabric that frays, either fold one end under, or zigzag stitch the end since it will be exposed.
    • Sew the opposite piece of Velcro to the finished end of the tab.


    •  Baste unfinished edge of the tab (Velcro side facing out) to the right side of the other outer bag piece (see photos in next step).

7.      Baste Straps in place:
  • For each outer bag piece, baste one of the straps 2” from each edge.  Be careful not to twist the strap.


8.      Sew Outer Bag:   Right sides together, sew around sides and bottom of the outer bag pieces.  Realign bottom corners of bag, cut off a 1” triangle as you did to the lining in step 2 and sew the openings closed.  Turn outer bag piece right side out.

9.      Sew Lining to Bag (YOU ARE NEARLY DONE!!!):
  • Bag lining should be inside out.  Outer bag should be right side out.  Place the bags right sides together (put the outside tote bag INTO the lining piece) and sew entirely around the top of the bag.  Make sure straps and Velcro tab are pushed to the inside!


  • Turn bag right side out through hole in lining.
  • After making sure everything is where you want it, sew the lining hole closed.  You can do it by hand, but it’s on the inside of a bag for kids, so mine are sewn by machine!
  • Push lining into the bag and topstitch around entire top of the bag for a finished look.
Step back and admire your handiwork!  That is, if your preschooler gives you a chance before claiming the bag...


If you make a tote bag, I would LOVE to see it!  Please take a moment to upload photos on my Flickr site:
http://www.flickr.com/groups/betweenthetoys/

Feel free to make as many of these as you’d like for personal use only, and give credit where credit is due.